

The Neck
 It
all starts with a shallow cut with a band saw across the neck blank to
create the head. Typically this is a 10 degree cut, but 8-12 degrees is
customary.
It
all starts with a shallow cut with a band saw across the neck blank to
create the head. Typically this is a 10 degree cut, but 8-12 degrees is
customary.
 The
headpiece is then glued on backwards to make the angled head.
The
headpiece is then glued on backwards to make the angled head.
 The
upper surface of the neck (where the fretboard will later be glued on)
is then milled flat at the appropriate thickness.
The
upper surface of the neck (where the fretboard will later be glued on)
is then milled flat at the appropriate thickness.
 This
needs to be a precise operation as the neck thickness is tapered.
This
needs to be a precise operation as the neck thickness is tapered.
 To
make the head the next step is to glue to the top side of the head
2 or 3 pieces of thin black and white veneer and a thicker
piece of hardwood to stiffen the head and give it
an appearance to match the other wood choices of the the guitar.
To
make the head the next step is to glue to the top side of the head
2 or 3 pieces of thin black and white veneer and a thicker
piece of hardwood to stiffen the head and give it
an appearance to match the other wood choices of the the guitar.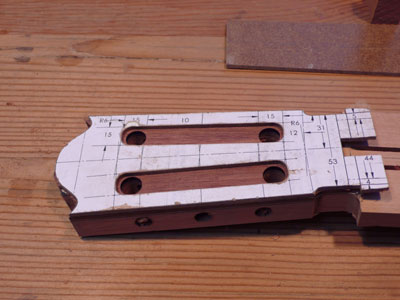 Then a
head template is glued to the top side with double-stick
tape and 4 guide
holes are drilled for the two slots.
Then a
head template is glued to the top side with double-stick
tape and 4 guide
holes are drilled for the two slots. A
pattern router bit is used to shape the inside and the outside of the
head to match the template.
A
pattern router bit is used to shape the inside and the outside of the
head to match the template. Shaping
the neck is really a sculpting task. It is very important that the
shape is "friendly" to the fingers that will play the guitar and should
be what the player expects. This shape has evolved over the history of
the instrument and needs to be closely recreated for each new
instrument. It would be easy to obtain a correct and consistent shape
using computer-controlled machinery, but for a hand-crafted guitar it
is the judgment and skill of the builder that counts. Fortunately human
eyes and fingertips are quite amazing at determining when the shape is
right.
Shaping
the neck is really a sculpting task. It is very important that the
shape is "friendly" to the fingers that will play the guitar and should
be what the player expects. This shape has evolved over the history of
the instrument and needs to be closely recreated for each new
instrument. It would be easy to obtain a correct and consistent shape
using computer-controlled machinery, but for a hand-crafted guitar it
is the judgment and skill of the builder that counts. Fortunately human
eyes and fingertips are quite amazing at determining when the shape is
right.